1. Introduction
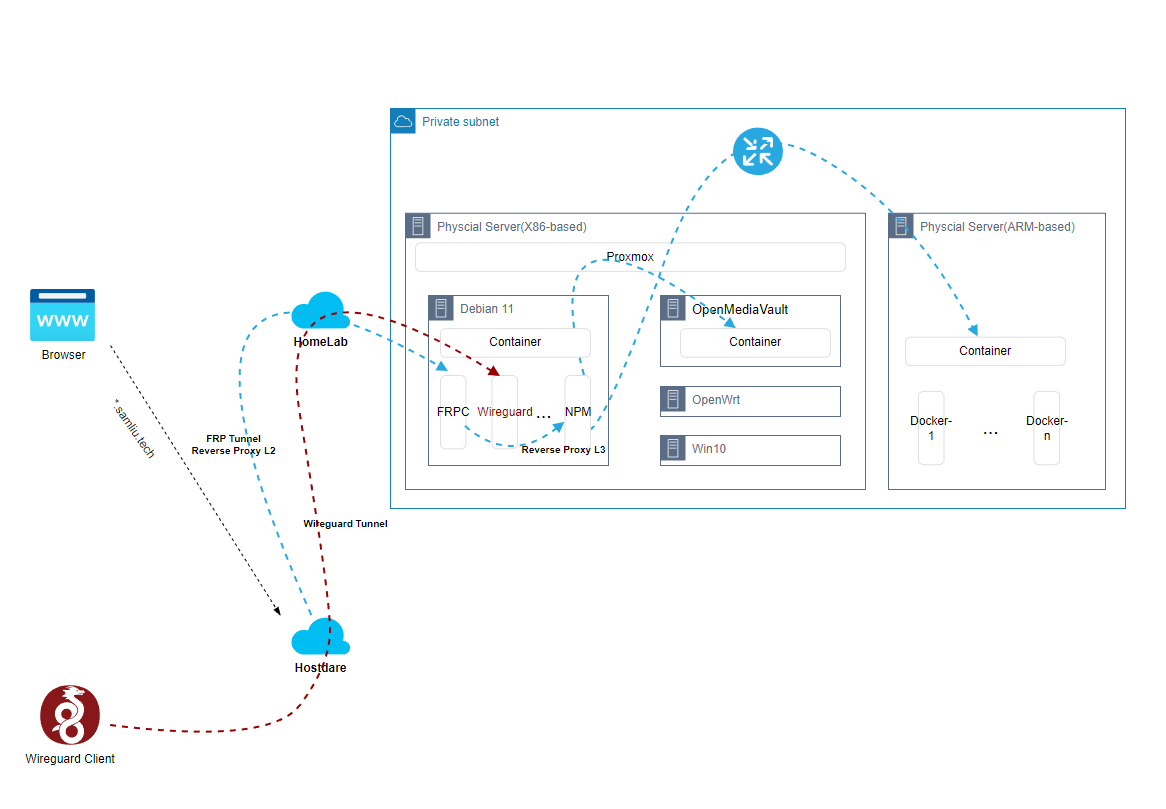
Regarding the “Architecture design and implementation – High-level design” chapter, the under-cloud part, the implementation of the local environment consists of Proxmox and its several VMs with different functionalities, as well as a number of Dockers with different functionalities within the VMs.
as follows:
- Proxmox, installation and configuration, etc., many functions and mixed, can be compared to Vsphere
- Debian VM, here as the main Linux use, a bit of Ubuntu’s stable version of the branch of the meaning, suitable for production environment system
- OpenMediaVault, an open source lightweight NAS system
- OpenWrt, as a proxy service for other services to use, non-transparent proxy
- Win10, a graphical workstation
- a Raspberry Pi, bare metal running, running multiple ARM architecture Docker applications
2. Deployment
1 Proxmox, Installation and Configuration
After the installation, it is still relatively simple to get it running. Here are the instructions Network-related configuration, for example, in my environment, I am using wireless to connect to the network.
root@pve01:~# cat /etc/network/interfaces
# network interface settings; autogenerated
# Please do NOT modify this file directly, unless you know what
# you're doing.
#
# If you want to manage parts of the network configuration manually,
# please utilize the 'source' or 'source-directory' directives to do
# so.
# PVE will preserve these directives, but will NOT read its network
# configuration from sourced files, so do not attempt to move any of
# the PVE managed interfaces into external files!

auto lo
iface lo inet loopback

iface enp1s0 inet manual

auto wlp0s20f3
iface wlp0s20f3 inet dhcp
        wpa-conf /etc/wpa_supplicant/wpa_supplicant.conf

auto vmbr0
iface vmbr0 inet static
        address 192.168.88.78/24
        bridge-ports enp1s0
        bridge-stp off
        bridge-fd 0

auto vmbr999
iface vmbr999 inet static
        address 100.64.0.100/10
        bridge-ports none
        bridge-stp off
        bridge-fd 0
#100.64.0.0~100.127.255.255

        post-up   echo 1 > /proc/sys/net/ipv4/ip_forward
        post-up iptables -P INPUT ACCEPT
        post-up iptables -P FORWARD ACCEPT
        post-up   iptables -t nat -A POSTROUTING -s '100.64.0.0/10' -o wlp0s20f3 -j MASQUERADE
        post-down iptables -t nat -D POSTROUTING -s '100.64.0.0/10' -o wlp0s20f3 -j MASQUERADE
        post-up   iptables -t nat -A POSTROUTING -s '192.168.88.0/24' -o wlp0s20f3 -j MASQUERADE
        post-down iptables -t nat -D POSTROUTING -s '192.168.88.0/24' -o wlp0s20f3 -j MASQUERADE
        #post-up iptables -t nat -A PREROUTING -d 10.0.0.111 -j DNAT --to-destination 100.64.0.111
        #post-up iptables -t nat -A PREROUTING -d 10.0.0.1 -j DNAT --to-destination 100.64.0.1
        #post-up iptables -t nat -A PREROUTING -d 10.0.0.2 -j DNAT --to-destination 100.64.0.2
        #post-up iptables -t nat -A PREROUTING -d 10.0.0.3 -j DNAT --to-destination 100.64.0.3
        #post-up iptables -t nat -A PREROUTING -d 10.0.0.10 -j DNAT --to-destination 100.64.0.10
        #post-down iptables -t nat -A PREROUTING -d 10.0.0.111 -j DNAT --to-destination 100.64.0.111
        #post-down iptables -t nat -A PREROUTING -d 10.0.0.1 -j DNAT --to-destination 100.64.0.1
        #post-down iptables -t nat -A PREROUTING -d 10.0.0.2 -j DNAT --to-destination 100.64.0.2
        #post-down iptables -t nat -A PREROUTING -d 10.0.0.3 -j DNAT --to-destination 100.64.0.3
        #post-down iptables -t nat -A PREROUTING -d 10.0.0.10 -j DNAT --to-destination 100.64.0.10
        post-up iptables -t nat -A PREROUTING -i wlp0s20f3 -p tcp --dport 3389 -j DNAT --to 100.64.0.111:3389
        post-down iptables -t nat -D PREROUTING -i wlp0s20f3 -p tcp --dport 3389 -j DNAT --to 100.64.0.111:3389
        post-up iptables -t nat -A PREROUTING -i wlp0s20f3 -p tcp --dport 445 -j DNAT --to 100.64.0.2:445
        post-down iptables -t nat -D PREROUTING -i wlp0s20f3 -p tcp --dport 445 -j DNAT --to 100.64.0.2:445
Configuration Logic:
- The wireless NIC, wlp0s20f3, acts as a gateway to connect to the home WiFi network through the wpa_supplicant service configured previously
- The wired NIC is enp1s0, bridged to the vmbr0 virtual switch
- Another virtual switch, vmbr999, is used to connect to the other VM NICs.
- Other virtual network segments configured with source NAT for accessing the Internet
- Configure a NAT Server for the wireless NIC wlp0s20f3 to facilitate direct access to the VMs from external networks
2 Debian VM
This VM is a main Linux system with a couple of important applications that docker installs
- FRP Client, used to connect to hosts in the cloud, establish an FRP tunnel, and act as a secondary reverse proxy
docker run --restart=always --network host -d -v /root/frpc_free_terminal.ini:/etc/frp/frpc.ini --name mele3q_frpc_free_terminal snowdreamtech/frpc

sam@debian:~$ more frpc_free.ini
[common]
server_addr = xxx.samliu.tech
server_port = 1234
token = xxxxxooooo

# Penetrate intranet services that require web access, such as the management interface of Synology NAS DSM.

[*.samliu.tech]
type = http
local_ip = 100.64.0.2
local_port = 80
custom_domains = *.samliu.tech
subdomain = blog


[Wireguard]
type = udp
local_ip = 100.64.0.3
local_port = 51820
remote_port = 9853- Nginx Management Proxy(NPM),Acts as a tertiary reverse proxy, forwarding to the real back-end service
version: "3"
services:
  app:
    image: 'jc21/nginx-proxy-manager:latest'
    restart: unless-stopped
    ports:
      # These ports are in format <host-port>:<container-port>
      - '80:80' # Public HTTP Port
      - '443:443' # Public HTTPS Port
      - '81:81' # Admin Web Port
      # Add any other Stream port you want to expose
      # - '21:21' # FTP

    # Uncomment the next line if you uncomment anything in the section
    # environment:
      # Uncomment this if you want to change the location of
      # the SQLite DB file within the container
      # DB_SQLITE_FILE: "/data/database.sqlite"

      # Uncomment this if IPv6 is not enabled on your host
      # DISABLE_IPV6: 'true'

    volumes:
      - ./data:/data
- ./letsencrypt:/etc/letsencrypt- Next-terminal, Web-based device management platform, supporting RDP, SSH, etc.
version: '3.3'
services:
  guacd:
    image: dushixiang/guacd:latest
    volumes:
      - /home/sam/next-terminal/data:/usr/local/next-terminal/data
    restart:
          always
  next-terminal:
    image: dushixiang/next-terminal:latest
    environment:
      DB: sqlite
      GUACD_HOSTNAME: guacd
      GUACD_PORT: 4822
    ports:
      - "8088:8088"
    volumes:
      - /etc/localtime:/etc/localtime
      - /home/sam/next-terminal/data:/usr/local/next-terminal/data
    restart:
always- Wireguard, Next-generation VPN solution, supports remote VPN and site-to-site VPN, connects to the intranet and is easy to manage.
version: "2.1"
services:
  wireguard:
    image: lscr.io/linuxserver/wireguard:latest
    container_name: wireguard
    cap_add:
      - NET_ADMIN
      - SYS_MODULE
    environment:
      - PUID=1000
      - PGID=1000
      - TZ=Asia/Shanghai
      - SERVERURL=1.1.1.1 #optional
      - SERVERPORT=9853 #optional
      - PEERS=3 #optional
      - PEERDNS=114.114.114.114 #optional
      - INTERNAL_SUBNET=172.16.0.0/24 #optional
      - ALLOWEDIPS=100.64.0.0/10, 192.168.0.0/16, 172.16.0.0/12 #optional
      - PERSISTENTKEEPALIVE_PEERS=all #optional
      - LOG_CONFS=true #optional
    volumes:
      - /home/sam/wireguard-appdata/config:/config
      - /lib/modules:/lib/modules #optional
    ports:
      - 51820:51820/udp
    sysctls:
      - net.ipv4.conf.all.src_valid_mark=1
    restart: unless-stopped
3 OpenMediaVault VM
Install openmediavault on Proxmox
4 OpenWrt VM
5 Raspberry Pi
ARM-architecture hardware with numerous Docker-based applications installed, such as this Pi Dashboardhttps://pidashboard.samliu.tech/
三 Other/references
iGPU Passthrough to VM (Intel Integrated Graphics)
https://3os.org/infrastructure/proxmox/gpu-passthrough/igpu-passthrough-to-vm/
How to Install Proxmox VE
https://phoenixnap.com/kb/install-proxmox

